Installation Guide
Related Installation Guides
This section describes KH-UCANFD_Linux_SDK installation process, as well as cross-compilation, channel binding, and other operation instructions.
System Environment Requirements
- Linux system running 32-bit or 64-bit kernel
- make, gcc compilation tools
- Linux system kernel header files (or Linux header file packages), or cross-compiling kernel source tree
- g++ compiler and libstdc++ library
- libpopt-dev package
Dependency Installation Commands
Before installing driver, please confirm that system environment meets above requirements, and execute the following commands to install dependencies:
# 1. Install compilation basic tools
sudo apt update && sudo apt install -y build-essential g++

# 2. Install kernel headers (must match current kernel version)
sudo apt install -y linux-headers-$(uname -r)

# 3. Install libpopt dependency
sudo apt install -y libpopt-dev

# 4. Verify gcc version (must match kernel compilation version, query method as follows)
cat /boot/config-$(uname -r) | grep -i "gcc_version"
# Example output: CONFIG_GCC_VERSION=120300 (indicates need to install gcc-12)
# If version does not match, install corresponding gcc: sudo apt install -y gcc-12
SDK Download
You can manually download from releases, or use wget.
# Install wget (if not installed)
sudo apt install -y wget

# Download SDK (latest version)
wget https://gitee.com/ChengDu-KunHong/KH-UCANFD_Linux_SDK/releases/download/latest/KH-UCANFD_Linux_SDK.zip

# Unzip SDK
unzip KH-UCANFD_Linux_SDK.zip

# Enter SDK directory (replace x.y.z with actual version number)
cd KH-UCANFD_Linux_SDK_x.y.z/
Compilation and Installation
Script Automatic Installation
After entering SDK directory, execute the following commands to complete one-click installation:
# Execute compilation script
./build.sh
build.sh Script Usage:
Usage:
  ./build.sh                    Install driver
  ./build.sh -c                 Cross-compile driver
  ./build.sh -rules             Install driver and load udev naming rules
  ./build.sh -u                 Uninstall driver
  ./build.sh -uninstall         Uninstall driver
  ./build.sh -h                 Display help information
Manual Installation
Execute the following commands to complete driver compilation and installation:
# Clean historical compilation files
sudo make clean

# Compile driver (if errors, check if dependencies are complete, if gcc version matches)
sudo make netdev

# Install driver (no errors means successful installation)
sudo make install
Driver Loading Verification
Load driver:
# Load kcan driver module
sudo modprobe kcan

# Verify if driver is loaded successfully (output containing "kcan" means normal)
lsmod | grep kcan
After unplugging and replugging CAN FD device, execute the following commands to confirm device is recognized:
# View CAN interface information (output containing "can0", "can1", etc. means normal)
ip -d link show
# View USB device driver binding (output containing "Driver=kcan" means normal)
lsusb -t
Cross-Compilation
The automatic compilation script can help you complete cross-compilation more easily. Operation steps are as follows:
- Prepare cross-compilation environment: install cross-compilation toolchain, kernel source code, etc.
- Open cross_compile_config.sh in SDK directory, modify corresponding paths.
export ARCH=arm64  # Set target architecture to ARM64
export CROSS_COMPILE=/path/to/your/toolchain/bin/aarch64-linux-gnu-  # Set cross-compilation toolchain path
export KERNEL_LOCATION=/path/to/your/kernel-source/ # Set kernel source code path- Execute compilation script:
./build.sh -c
Uninstall Driver
Uninstall driver:
# Use script to uninstall
sudo ./build.sh -u

# make uninstall
sudo make uninstall
Channel Binding
SDK provides three channel binding methods: driver binding, USB binding, and ID binding.
Driver Binding
Through build.sh script, corresponding udev rules are automatically configured and loaded, using kcan as the driver device name for all devices.
Operation Steps
- Execute build script and automatically load udev rules:
sudo ./build.sh -rules- After compilation is complete, unplug and replug device.
Effect Verification
The effect after successful binding is shown in the figure below:

USB Binding
Overview
By manually setting udev rules, specific channel names are bound according to USB port information.
Operation Steps
1. Get Device Port Information
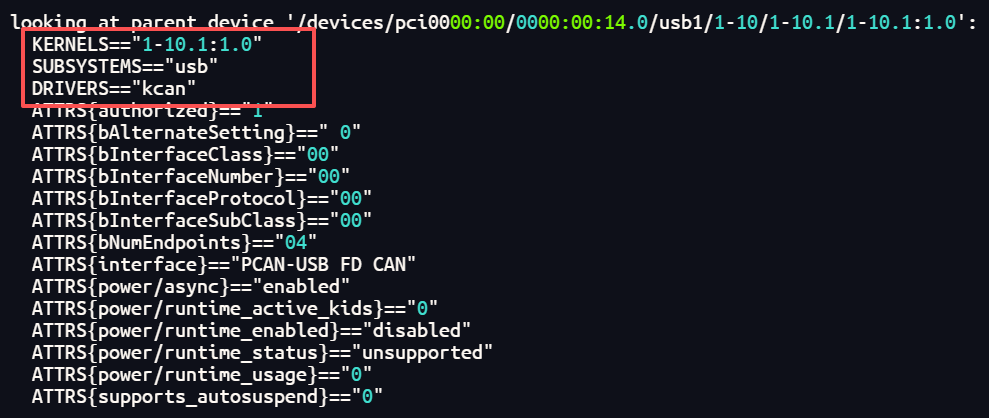
Use the following command to get device USB port information:
udevadm info -a /sys/class/net/can0Output example is shown in figure below:
2. Create udev Rules File
Create rules file:
sudo vi /etc/udev/rules.d/99_kcan_usb.rulesAdd the following content to the file (modify KERNELS, NAME parameters according to actual situation):
SUBSYSTEM=="net", ACTION=="add", DRIVERS=="kcan", KERNELS=="5-1.3:1.0", NAME="kcan0"
SUBSYSTEM=="net", ACTION=="add", DRIVERS=="kcan", KERNELS=="5-1.4:1.0", NAME="kcan1"
3. Reload udev Rules
sudo udevadm control --reload-rules
sudo udevadm trigger
4. Verify Binding Effect
Unplug and replug device. The binding effect is shown in the figure below:

ID Binding
Overview
By setting device ID and configuring driver parameters, channel binding is achieved.
Operation Steps
1. Modify CAN Device ID
Use kcan-settings tool to set device ID for each channel:
# Set can0 channel ID to 66
kcan-settings -f=/dev/kcanusbfd32 -d 66

# Set can1 channel ID to 67
kcan-settings -f=/dev/kcanusbfd33 -d 67

# Continue setting other channels...
2. Confirm ID Setting Success
View device ID:
kcan-settings -f=/dev/kcanusbfd32 -d3. Modify Driver Configuration File
Edit kcan driver configuration file:
sudo vi /etc/modprobe.d/kcan.confAdd the following configuration parameters to the file:
# Enable assignment based on device ID
options kcan assign=devid
4. Reload Driver Module
sudo rmmod kcan
sudo modprobe kcan
5. Verify Binding Effect
Unplug and replug device. The ID binding effect is shown in the figure below:
