Practical Tools
Detailed Guides
- KCAN Firmware Tools
- lskcan — List CAN Interfaces
- kcan_monitor — CAN Bus Monitor
- kcanfd_test — Stress Test Tool
KH-UCANFD_Linux_SDK integrates multiple tools including kcanfdtest and lskcan, allowing users to use devices more easily.
lskcan Enumerates Interface Information
lskcan enumerates CAN interface details:
lskcan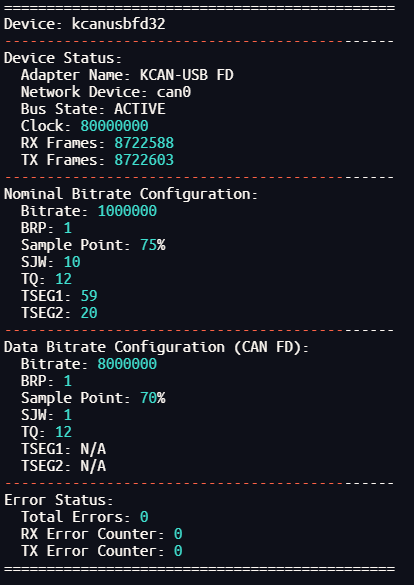
Enumerates all interfaces' device status, as well as detailed bit rate configuration, facilitating users to check CAN device status.
kcan_monitor Monitor
kcan_monitor can real-time monitor CAN bus status and CAN transmission frame statistics:
kcan_monitor
Field Descriptions
| Field | Description |
|---|---|
| dev name | Device physical identifier and channel number |
| ndev | Network interface name assigned by Linux system SocketCAN subsystem, such as "can0", "can1", through which standard tools like candump, cansend can operate |
| bits | CAN FD bit rate configuration, format is "arbitration phase bit rate + data phase bit rate" |
| bus | Bus operating status: ACTIVE (normal active status), PASSIVE (passive status), BUSOFF (bus-off status) |
| %bus | Bus load rate |
| %tx fifo | Transmit buffer usage rate |
| rx_fr/s | Frames received per second |
| tx_fr/s | Frames transmitted per second |
| rx | Cumulative frames received |
| tx | Cumulative frames transmitted |
| rec/tec | Receive error count / transmit error count |
| err | Cumulative error count, including total count of various CAN bus errors such as bit errors, stuffing errors, etc. |
kcanfd_test Test Script
Introduction
kcanfd_test.sh is used to test whether UCANFD device can normally send and receive data without packet dropping under full load conditions.
After driver installation, run sudo kcanfd_test.sh in command line. The script will automatically complete driver loading, parameter setting, data packet transmission/reception, and result verification.
Test Steps
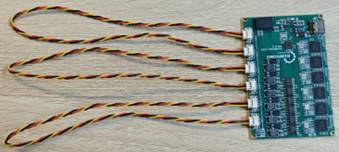
Cable Preparation
Before testing, you need to connect device CAN interfaces in pairs according to channel sequence. Taking UCANFDX6 as an example, refer to wiring diagram:
Test Process
The script's detailed test process is as follows:
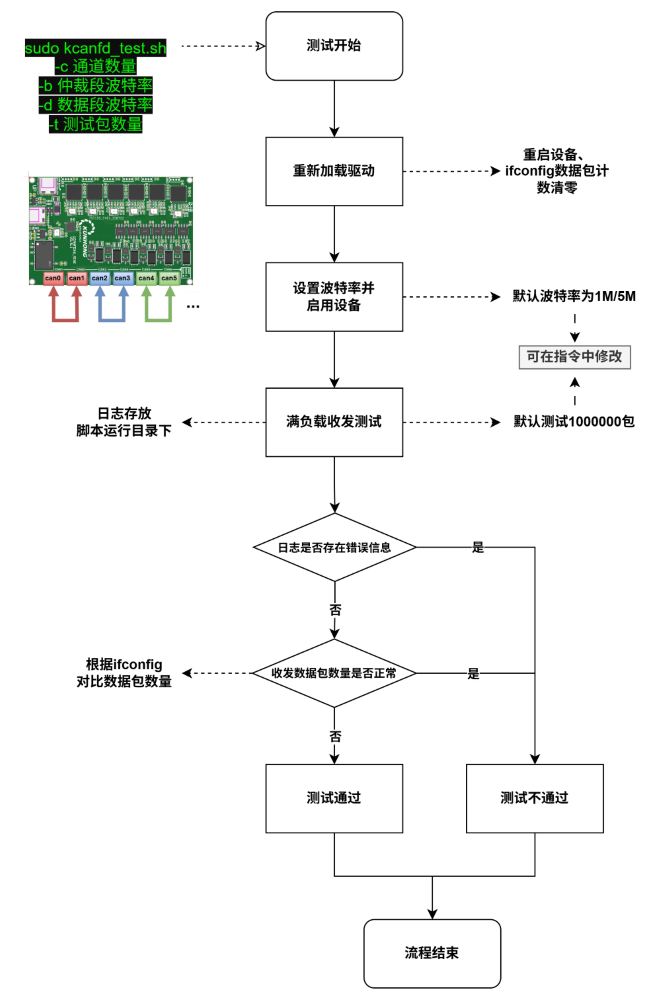
One-Click Test Instructions
The script defaults to testing 6 channels with 1M/5M bit rate. You can modify the following parameters as needed:
-c: Number of channels (≤ 12)-b: Bit rate (e.g., 500000 represents 500 kbit/s)-d: Data phase bit rate (e.g., 4000000 represents 4 Mbit/s)-t: Number of test data packets
Example:
# Enable can0 and can1 two channels, set bit rate to 1M/5M, test transmission/reception of 500,000 data packets
sudo kcanfd_test.sh -c 2 -b 1000000 -d 5000000 -t 500000
One-click test channels default start from can0, and are sequentially paired in groups of two. If you need to customize test channels, you can refer to the following method.
Custom Test Instructions
For example: Need to test can1 and can4 two channels. You can use the following commands:
# Enable can channel before testing
kcanfdtest -b -d can1  # can1 enters loopback mode
kcanfdtest -b -d -g can4  # can4 generates frames in loop
Here -b -d indicates test mode is FD frames with BRS.
Log Description
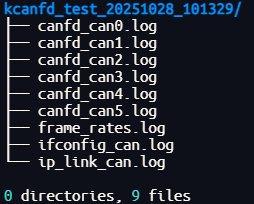
The test will automatically generate logs. Logs are saved in the directory where the running script is located by default:

Log content includes test details, frame rate, and interface transmission/reception data packet count records. Directory structure example: